Pages

Sunday, December 25, 2011

Our non-traditional Christmas!

We have had a really nice day today, just our little family (Bryan, Pilgrim, and me)! We never left the house! After some homemade orange cinnamon rolls reheated from yesterday and a latte,
we watched a couple episodes of Modern Family, ate a grapefruit, played our new board game (Ticket to Ride), and then made crawfish inside-out sushi rolls with avocado, green pepper, and a Crystal hot sauce mayo! Black sesame seeds added a little crunch, and it was pretty close to perfection! We were so pleased that it worked - we're going to make more tomorrow!
Then we watched that light-hearted family movie (sarcasm), In Bruges, while a perfectly happy kitty slept in my lap, and I did a little hand quilting! Not exactly an uplifting movie per se, but Bryan liked it. Bryan is prepping some fingerling potatoes for roasting since I'm providing a warm lap for our sweet girl, and we'll have leftover braised short ribs, sautéed mushrooms, potatoes, and maybe a delicious leftover whole wheat roll (my best batch ever) in a bit for dinner! We had a piece of leftover mocha cake for our mid-movie snack, so dessert is already eaten (so good)! Perhaps another movie or some reading tonight! Low key day - exactly what I needed!

We said we weren't really exchanging gifts, but Bryan got me an awesome apron with my family tartan and seal on it, Ticket to Ride, and 2 exciting cookbooks - The Commander's Palace Cookbook (a restaurant in New Orleans that we loved on our trip in May) and "The Best Make Ahead Recipe" from Cook's Illustrated. Lots of inspiration and great ideas...can't wait to get cooking!

Becky wrote a great post about the gift-giving to the family that I wrote about a few days ago. It made me so happy to do something nice for someone really in need. Everyone in my family (both immediate and extended) is doing pretty well, so it can be a little hard this time of year to think of a gift that they want but don't already have...part of why I'm so behind on gift shopping (not too mention making presents!). It feels so good to be a tiny part of helping to make someone else's life just a little better...someone who doesn't already have more than they need (myself included).

I'm so thankful to have a loving partner, a wonderful family, a sweet little snuggle bug who loves sitting on me, very good friends, a roof over my head and delicious food to eat every day, and money for luxuries like fabric, thread, and a sewing machine! I'm so fortunate, and I realize that!

I'm also thankful for my new community through the Interwebs! I love getting to know you and your families, seeing what you are working on, being inspired, and knowing that I'm not alone in my love of creating beautiful, functional art! It's been really fun so far, and I'm looking forward to lots more sharing in 2012!

Thanks, and I hope you are having a joyful holiday season!

Saturday, December 24, 2011

I won!

I've been fortunate enough to win two giveaways this year.  Back in July, when I was just starting to get into reading blogs (and before I'd even really written much on this one!), I won a fat quarter bundle of Joel Dewberry's Heirloom line from Karen Gray of Karen Gray Designs via Jennifer of Ellison Lane Quilts.  In addition to a great bundle of fabric, Karen included a quilting magazine in which she was featured - so cool!  I've yet to use that fabric, partially because I was convinced that I could make 3 different quilts out of that bundle and carefully planned my cuts based on an 18" x 22" piece of fabric before I remembered that there would be some shrinkage when I prewashed.  Whoops!  I need to redo some of my layouts before I cut into it, so...that's still on the to-do list!  (I'm very much in the pre-washing camp, in case you were wondering!)


This past week, I entered several of the Sew Mama Sew Giveaway Day giveaways, and I won my choice of a pattern by Amy Smart of Diary of a Quilter.  I chose her Double Crossed pattern, as it reminded me of the Urban Lattice design that I'd seen at Me? A Mom? over the summer that I never got around to making.  I have really liked this look for awhile, and I was interested to see what Amy's measurements looked like and if she had figured out a different way to do it that could go together even faster, as I definitely wasn't interested in the paper-piecing/string block method (too much work!).  Amy's method is way more my speed.  I also really like the Facets quilt that Tracey made, as well as her method.  http://traceyjayquilts.blogspot.com/2011/01/quick-how-to-urban-lattice-blocks.html
They are different enough that I may have to try both!  Double Crossed looks like a nice weekend project, which would be pretty welcome after some of my more complex piecing of late!  I might even try the "cut everything out according to the pattern measurements" method for once, instead of my usual method of coming up with my own way of doing things!

Anyway, I feel very fortunate to have had Mr. Random Number Generator land on me twice this year!  And since I tried to win a lot of books and fabric this year where I wasn't so lucky, I might just have to splurge and go on a little shopping spree, perhaps in January for my birthday (or perhaps I'll be smart and take advantage of after-Christmas sales, if those exist this year!).  Of course, I don't need any more projects or inspiration right now, nor do I need any more fabric, but...

I think one of my early 2012 projects will be to come up with a page with all the quilts and other projects I'd like to make, with the fabrics I'd like to use, so that I can have a check-list of things I want to work on (ala Candy of Candied Fabrics wonderful monthly checklist).  Someday, I'd also like to have a page showing all the quilts I've made over the years...though the picture collection process will be the most difficult part of that endeavor.  I wish I'd kept photos of all of them...especially the baby quilts I've made.  I'm hoping that I can get my brother to dig out the ones I made for my nephew when he was a baby, since they, in particular, were outstanding - one in particular where I did some incredible embroidery that I'd like to see again.  We'll see how that goes!

Today, I did a bit of piecing this morning, followed by what was supposed to be the beginning of the bake-a-rama! I've got a lemon pudding cake in the oven now, and a little cat who needed a lap. In a few minutes, I'll get up again and get the fresh rolls started, then the "Swedish Tea Ring" (aka my grandma's coffee cake). I'd hoped to make several batches of cookies, too, but truth be told, I'd rather go take a nap! Not sure why I'm so tired lately...perhaps job stress, perhaps a little cat keeping me up at night? Perhaps I'm just getting older? Anyway, we're having the big family Christmas celebration tonight with Bryan's family, and it should be really nice. Bryan's mom, Margery, is making shrimp and grits, along with a mocha cake! Bryan's SIL is bringing salad and wine, we're in charge of bread and lemon cake, so...plenty of dessert even without loads of cookies!

Hope you have a very happy holiday season,
Elle

Thursday, December 22, 2011

More progress

I spent many hours in the sewing studio over the weekend and a couple evenings last week, along with a good part of the day yesterday, and I'm making great progress on my Storm-At-Sea. I've got 4 columns joined together and a 5th column pieced.  Yesterday, I finished piecing all the little square-in-a-square blocks, as well.  I'm absolutely loving how it is coming together, and it's been made easier thanks to a $5 purchase at my new-to-me closest local quilt shop last Friday night - grippy adhesive rings that I applied to my Fast2Cut templates! I had been having a horrible time trimming my diamond units because the template kept slipping, but no more! The pics aren't great - quick snaps of the pieces laying over the side of the guest bed, but it's better than the design wall mess pictures, right?! I'm being pretty careful, and it seems to be paying off - my points are matching better than I would have expected!  It's taken a ridiculously long time, so I might not tackle it right away, but I will make one of these for myself some day.  It really is one of my very favorite designs - I love that wave on the diagonals!

I also thought I'd show some of my side projects using the scraps - these are a few of my tiny chevrons...


And a few of the pieces to make more chevrons as I get more HSTs put together into flying geese units. I also have had fun with my triangle off-cuts making little kites, then seeing them together! I'm either going to appliqué these to make little mug rugs or potentially use them as a focal point on a bigger quilt.  They end up being seven-sided, so they are a bit strange, but waste not, want not, right?  (And yes, Santa-Elle is buying herself a new ironing board for Christmas!  I might also finish up with my sewing room reorganization - that would be pretty exciting!)

I'd thought about putting some of the off-cut pieces on the back of my storm-at-sea, but I've decided that this back will be simpler than my norm...a solid with just a few stripes. The calm in the storm, so to speak - especially since I don't know yet whether it will end up as a wall hanging or being used as a sofa quilt!  

I haven't looked at enough storm-at-seas to know, but I'm thinking about just binding it when I get to the edge and not including any borders...I'm worried that they'll break up the pattern too much.  I guess I'll see when I get there...it's definitely close.  I need to piece 4 more diamond units, since I decided to go bigger than originally planned.  I've got about 9 more big SIS units to add the final triangles to, and then I just need to trim and make the columns, connect, etc.  I think one or two more good days of sewing, and I might have a complete top!  Hooray!  I have no idea how I should quilt it, either...suggestions are welcome!

My big project got pushed to the side briefly this weekend for a bit of charity sewing. Becky had blogged about making some quilts for a family that had nothing - their 18-month-old had been sleeping on a board on the floor until recently! She'd just gotten a mattress, but had no bedding, so I'd volunteered to make a fitted crib sheet out of this cute fabric I'd gotten at an online store's going-out-of-business sale.  I had a bit of fabric left over, so I made a really cute top sheet to match!  I wish you could really see the detail in this sheet...I went a bit over the top, perhaps, but it turned out so great ("adorable" was Becky's word!)!  I sewed it such that I had a fold of white sheet at the top, which I folded over again and top-stitched so it has a nice thick edge...easier for little hands to grab to pull up or down. Of course, the band of print just makes it so pretty!  I thought about doing a blind hem, but decided instead to turn over two layers of fabric and top stitch around the entire perimeter in hopes that it will be sturdier.  I know it's silly to get excited about making bedding, but it is something I really enjoy doing, and I love the idea that I've been able to help someone while doing something I enjoy!  The crib sheet has French seams and elastic across the corners in a diagonal so it hooks under the bed - I'm hoping that will work better than the typical way elastic is applied to keep the fitted sheet secure. 

Becky is finishing quilts for both kids and delivering them on Christmas Eve, so I'm glad that these arrived in New York in time for delivery (and so that Becky could incorporate the remaining pieces of the print onto the back)...hope it makes someone's Christmas a little brighter!

I'm also making progress on the hand-quilting on Anne's mini quilt...though it's a little slower than I'd like, since usually as soon as I sit down, I have a cat in my lap, and she can be a little hard to quilt around!  I'll probably take it home to Georgia after Christmas if there is room in my bag, since I suspect I'll do a fair amount of "visiting" with my family.  I'm only there for 5 days, and I have one friend who wants help making a t-shirt quilt, along with a trip to visit my brother and nephew in Athens, so I'm sure it will be a whirlwind, but I love having some hand-work with me - that ensures that the trip won't be dull (indeed, if I have sewing, we'll never sit down)!  I'm really looking forward to the trip...I've missed my parents a lot, despite frequent phone calls.  Of course, I'll miss Bryan and Pilgrim when I'm there...I guess it is a good problem to have to love and be loved by people in multiple states!

Happy holidays!

Wednesday, December 14, 2011

Storm at Sea Preview...

I thought I'd give a few sneak peaks of my current piecing project (while I handquilt Anne's quilt).  This quilt is long, long overdue.  It was meant to be a wedding present for my friends, Talia and Aaron, who were married on Columbus Day weekend of 2009.  I had given them a beautiful piece of pottery as their official wedding present before they even got married, so my goal was to have it finished by last Columbus Day.  Well, I'd made great progress, having finished lots of diamond units and the middle part of the large square-in-a-square units, but I got stuck on layout.  I'd tried this arrangement, carefully balancing the tones of the center squares and the diamond units, and then I didn't know where to go next.

I tried various designs, and even had Talia stop by to take a look on our way to the Renn Fest over the summer.  Despite her assurances that she'd like it however it turned out, I was unhappy with my options, so I set it aside and worked on Anne's quilts.

Well, I got it back out recently and put it up on the design wall, and it seemed to just fall into place (or I decided to just go with it...probably the latter!).

It doesn't look like much here...I took lots of pictures (most of which I'll spare you) because my pieces have had a tendency to fall off the piece of flannel when my cat comes in to ask me to return to being social (another reason to make a real design wall!).  But, over the last week, I've managed to get 3 columns put together, and I'm loving it!  It is nothing if not time-consuming, especially since my perfectionist side is coming out in spades, leading to...drum roll...lots of pinning!

My goal now is to finish 1 column per evening.  That may be difficult to keep up, since Bryan does occasionally like to see my face, but still...I really want to get this done.  (Bryan asked me on our walk on Sunday if his t-shirt quilt could get into the mix, and I told him I had to finish this first, so I suppose that may help!)  Hopefully Congress will adjourn soon so I can take a few vacation days and sew all day...my idea of heaven!  I wish I could have taken a picture of the two columns that have already been stitched together, but it was quite dark last night, and the only place to photograph them would be on the bed, which, despite my organizational efforts, is still covered with fabric.  I tell myself that if I just sew faster, I'll use up my fabric before I finish getting it all put away.  Of course, since I've decided to make a Chasing Chevrons mini-quilt with the off cuts from my little square-in-a-square units, that seems unlikely.  The chevrons will finish at maybe 2 or 2.5 inches.  But...they are a great way to use leaders and enders and have a surprise extra quilt when it's all done.  That is what I'm telling myself as I try not to burn my fingers ironing open seams on itty-bitty half-square triangles!

So much to sew, so little time!

Tuesday, December 13, 2011

Culinaerie, or why you should become a "Master" Chef

I'm very sad this week, as I don't have my cooking class to go to anymore.  For 24 weeks this year, I've been taking the greatest cooking class (called the "Master Series") at the greatest place - Culinaerie.  Indeed, I think that, having taken both 12-week sessions, I can now call myself a "Master" without choking.  (My mom would call me the "Master of Disaster", and she would not be entirely wrong, though I aim to show her otherwise on my next visit home in just a few weeks - hooray for cooking with/for my parental units (as I lovingly refer to them)!) 

I'm now going to gush about how Culinaerie has changed my life, and I feel like I should say, upfront, that I get nothing from this endorsement except the satisfaction of hopefully helping other people change their life for the better by really learning how to cook, as I did!  I thought about sending my chef-instructor a gushy letter as a testimonial, but this is so much better and more embarassing (as well as being slightly less stalker-like, hopefully).  Hmmm...

My Culinaerie adventure started almost 2 years ago, when I saw a Living Social deal on a knife-skills class at this place I had sort of heard about from my friend, Anne.  Anne's husband had bought her a gift certificate for a class at Culinaerie some time ago, and I was intrigued, but thought nothing more about it until taking part of a knife-skills class at the Washington Metropolitan Food and Wine Show (or something like that) with my friend Heather.  I'd always been horrible at cutting things (without a rotary cutter), despite being in other respects a decent cook.  (Indeed, in the eyes of many of my friends and colleagues I was already a great chef, having gone to baking school in Vermont for a week (hooray for King Arthur Flour) and taken a couple of one-time demo classes at the Cordon Bleu in Paris on vacations there, and more importantly, having grown up cooking with both of my parents - to the point that we even self-published a family cookbook when I was little.)  But, in reality, I was slow, not confident, and I preferred baking, as that didn't require the good knife skills that savory cooking did.  After seeing in that partial class that knife skills are the difference between cooking being a joy and a hassle, I decided that I needed to take an actual class, and my birthday was coming up, so I jumped on this Living Social deal and convinced 9 of my friends to do the same in just one day - it was a knife skills class for $40 and included dinner - ummm...yeah!  And yes, my friends love me - I'm extremely fortunate!

That said, scheduling 10 people became a nightmare, so we ended up having to split the group up, and thankfully, my friend Hanna gave me her slot when neither date worked for her so that I could be with both groups, since the point of this knife-stravaganza was to be my birthday celebration.  It was a blast both times, and getting to go twice really cemented things for me (I'm a slow learner, apparently!).  I immediately saw a huge improvement in my cooking (and enjoyment of cooking), so Anne and I decided to take a 3-week sauce class together over the summer.  It was a great introduction to sauces, and truly, being able to make proper sauces is the difference between being a cook and a chef.  I'm still working on it, but I've had some pretty great results.  That class, also, was a great introduction because sauces are covered in context throughout the Master series.  (I would have been fine to have not taken the sauce class, but again, it's the repetition and context that makes it come together to be part of my repertoire, and I think I might have been a little overwhelmed at times had I not had sauces first.) 

Then, I guess it was about this time last year, Anne and Cillian were out to dinner with Bryan and me, and we decided that Anne and I should take the "Master series", even though it was part II.  It was a big decision - at $975, it was a major investment, and I definitely gulped at the price.  However, I can now say, it was SOOOO worth it!  Each session is 12 classes, and each class is 3 hours.  Most classes had about 1.5 hours of instruction and demoing by Chef Susan Watterson.  She covered an insane amount of material in that time, as well as handing out tastes of the things she discussed, and then we had the opportunity to use her wonderful kitchen, ingredients, and equipment to practice the techniques that she had just taught us.  We made our dinner for that night (though I often took what I'd make home for leftovers for at least lunch the next day).  Being able to try different spices and flavor profiles without investing in each new spice - that's huge!  And most importantly, the techniques I learned will serve me well for my entire life, plus many of them will save me money.  Between the series last winter/spring and the series that just ended, I learned how to debone chickens, cornish game hens, fish, and lots of other bony things and then cook them perfectly!  That means I can buy whole organic chickens, which cost much less than just buying organic chicken breasts, and I can use every bit of what I've purchased to make a huge variety of meals.  We talked about eggs for an entire class, and that didn't seem like long enough - I'm an even bigger fan of the Incredible Edible Egg now!  We covered vegetables, fruits, greens (which was really a class all about salads, which, I must say, are a lot more varied than I ever would have realized!), and grains.  We had classes on pastry, bread, and chocolate.  I learned how to cook shellfish and have since made wonderful clam chowder and an asian-inspired clam soup with soba noodles.  In our crustacean class, I cooked a lobster perfectly, and wow - let me tell you how much Bryan liked it when I came home that night!  I had lobster for our appetizer the next night, as well as jambalaya, shrimp bisque, and a bit of a ginger, lime, scallion compound butter that was meant to be served with crawfish over a piece of fish, but which I ended up using to reheat roasted sweet potatoes, and let me tell you, wow!  I've made boeuf bourginon multiple times.  I've braised short ribs, made chicken stock, and I'm now the rice pilaf queen.  I would have to write a book to describe how much I've learned, and the best part is, I'm only going to get better as I use what I've learned to continue to experiment in a way that promises to have more success than failure.  I love cooking now - it's an adventure every time I step into the kitchen if I want it to be (though I'm sure there will still be days when I eat plain cheerios with a banana).  Susan really focuses on both mental and physical mis en place - a French term meaning roughly "everything in its place".  When I stop and think about what I'm making and prepare accordingly, I can do some pretty wonderful things!

Here's Susan, my culinary hero:


And she is standing behind part of the spread from our final class - a class on hors d'oeuvres.  We watched her make pate a choux, work with phyllo dough, make crepes, and shape puff pastry, and then we had the closest thing we've had to a "Top Chef" style competition.  We had one hour to make enough pieces to feed the whole class, and the sky was the limit.  We had all learned so much, as was evident as we celebrated over a lovely collection of hors d'oeuvres, sipped wine, and talked food.


It was a great end to the class, except that I don't want it to end!  It's been one of the things that I've looked forward to every week for the last 12 weeks - I'm happy to say I never missed a single class all year, and I always tried to make the best possible use of my time in class to try as many of the techniques that she had demonstrated as possible.  At the end of the class, Susan gives us a recipe packet - as we went along, we took notes, but the whole point of the class is to learn how to cook intuitively without needing recipes.  I like looking at the recipes to jog my memory, but I've already had fun coming up with my own variations.  This is the ultimate skill set for looking in your pantry/freezer/refrigerator and being able to answer the question "what's for dinner" in a way that makes use of what you have and allows you to make something delicious!

So, this is my pitch - I think everyone with an interest in food or who plans to feed their family should take a class like this!  Being a better cook makes it possible to eat better/cheaper/healthier and probably faster, which, of course, leaves more time for quilting!  I wish that these skills were taught to kids in home ec in schools, because I can't believe I've survived into my 30s without knowing what I know now.  I truly believe that if people knew how to cook better for themselves, without needing processed and "convenience" foods, we'd have a healthier, happier country.  And we'd all consume a lot more cream sauces.  YUM!

Thursday, December 8, 2011

It's Pinned, and a Placemat...

Well, I didn't get as much sewing (or studio organizing) done as I'd hoped over the weekend.  Instead, I scraped and painted around our front door, since that's been on our "to-do" list since July and we had a lovely bit of warm, sunny weather that I wanted to take advantage of.  When he was done raking the leaves in the front yard, I had Bryan dig a trench for me to plant some bulbs in (that I bought last year and never got around to planting).  Unfortunately, I was so worn out from my painting duties that I didn't get them planted.  Now, it is really cold and the trench is filled with water from our rain/sleet/wintry mix.  Oops!  Indeed, my exhaustion led to a call for pizza from Three Brothers for dinner...a sign that I was really wiped out (though it did taste good)!

We spent much of Sunday making food for the week.  Cauliflower garlic saffron soup for lunch, which was disappointing perhaps because my cauliflower was too old and I didn't use homemade chicken stock or enough saffron - d'oh!  We made a huge pot of spaghetti sauce for weeknight meals and the freezer, and then for dinner had chicken breasts baked with cumin and adobo spices, topped with a chipotle, lime, peppadew, garlic compound butter with a side of sauteed mushrooms and roasted rosemary olive oil fingerling potatoes.  I even managed to make my Monday dinner at the same time with the extra bit of chicken thighs from the freezer (I had broken down and made stock from 2 organic chickens a couple of months ago and had frozen the extra meat) - so I used my mushroom pan to make a quick chicken with mushroom cream sauce, which, when served over the extra potatoes, was to die-for.

I did manage to get the new quilt pinned, and I've begun the quilting.


Anne handquilts all the quilts that she makes and gives (which always amazes me, considering how many she has made and given away to her cadre of pregnant friends!)  I decided this quilt was worthy of some hand-quilting (plus I couldn't decide how I wanted to quilt it by machine!), so I've gone ahead and marked flowers in the center of each of the squares.  I was planning to free-hand about a 1/4 inch from the edges in all of the white parts, but I'm thinking it is probably worth it to mark it, since this was my best effort at free-handing...not exactly perfect (though probably not bad enough to pull out - I'll see when it's all done whether it bothers me).  The white center squares are 2 inches, so I'm only doing a square that is about 1.5"/side - in theory that shouldn't take too long, plus I've been wanting to have something I can do downstairs so I can be busy while watching/listening to television by/with Bryan.  [We are totally hooked on Modern Family and trying to catch up - just finished watching the first season, and I can't remember when I've liked a tv show more, but that one isn't ideal for quilting, what with actually watching it and laughing!]  I'm contemplating running some straight lines through the sashing by machine, but I don't want to lose the basket-weave effect (and I think starting and stopping might be annoying), so I'm still debating it, plus it would be nice to give her a quilt that is completely hand-quilted.  I think it will be quilted enough with the white spaces (and the pink flowers) to be strong, but I expect this to be washed a lot, so that's the challenge/debate of leaving off all the machine-quilting.  I also must say, if I didn't love my friend as much as I do, I'd have a very hard time giving this one away - I'm so happy with how it is turning out!  The night-time pictures on my sewing table don't really do it justice!

Speaking of giving things away, I made a really cool t-shirt quilt for my aunts this summer that was delivered on the day of their civil union in Illinois.
Eventually I'll get a better picture of it from them - one where it is actually on the bed instead of me trying to hold it up in the living room - it's heavy!  (I'll also learn how to make photos flip to the correct orientation.)  Anyway, I bought a LOT of extra fabric for it, since I wanted to be sure to have enough and, as per usual, I was coming up with the design as I went along.  I made them 4 pillowcases, including a little flange with some of the extra piano keys that you can barely see on the side (bottom, in this picture) of the quilt.  (They also ran across the back - I used a jelly roll of batik purples that I'd been saving for a long time for a very special use, and this definitely qualified!) 

But I still had more fabric!  So, I made my "aunt-in-law", Linda, an improv-pieced/quilted ipad cover.  Linda completely rocks my world, and she sadly had recently gotten rid of a lot of her old t-shirts, so when I visited them and brought up the t-shirt quilt idea again, Casey lucked out, but Linda got left out.  So, I really wanted to have something that was just for her to make up for my poor communication about the idea.

This photo was before I quilted it.  I guess I didn't take any pictures of the finished work, which is ashame since the quilting on it was really cool.  I'll request that picture, too - I have a horrible tendency to give away presents before photographing them, but I'm trying to get better!  I may have made the cover marginally too small - it's probably a tight enough fit that it isn't being used, since I based it on the size without a protective cover (and wanted it to be snug, since it is also a carrying case the way I designed the handle/flap).  I have ideas for a better one at some point, perhaps one that Linda picks out the colors for, rather than trying to have it be a surprise (in this case, it was for her birthday and our visit in August).  I enjoyed making it - very freeing to just play with the fabric!

Well, I still have more fabric, but not too much more!


So...I decided I could finally use it all up with placemats (again, imagine the photo flipped 90 degrees!).  The DC Modern Quilt Guild met out at Capital Quilts, my normal LQS, and the place where I purchased all this excess yardage!  Susan, the co-owner and head quilting cheerleader, showed us her placemat method, which involves sewing the strips right onto the batting and backing so that it is quilted as you add each piece.  I used this flip and sew/quilt method of construction, but I decided that instead of doing the normal binding, I would just sew the back around to the front, at least on this one - the test model - which I decided to keep for me.  I eat lunch at my desk now rather than taking a lunch break, in an effort to be able to spend less time at the office and more time at home with my honey (and commuting almost 2 hours/day makes that even more essential).  In an effort to protect the wood on my desk, I decided a placemat is in order, and in the one day that I've used it, I've loved it (though it helps that purple is one of my favorite colors). 

I may have enough fabric to bind all 4 placemats that I've got cut out for my aunts (thanks to a fun demo of an Accu-quilt cutting machine), but I'll have to see.  In case I don't, I'm going to use some tricks I learned from the test one to make it possible to bring the back around to the front for the binding in a much neater fashion, since it would definitely miss the point to have to buy more fabric to finish them!  I also gave some thought to the idea of planned obsolescence.  With a quilt that is meant to be a family heirloom, you want it to last forever, and then a bias-cut binding is definitely the way to go.  But with placemats...well, tastes change, and I think it is nice to have them wear out eventually, since that is a great excuse to get/make some new ones (and if they were really loved, I could always rebind them).  So, for these, I'll either use a straight-grained binding if I have enough fabric left, or I'll just fold over the backs and not worry about it!  (I will, however, try to do a better job on the next ones with making a little tutorial with the tricks I've learned, since I doubt I'm the only one who overbuys fabric!)

Tonight, we're off to see the Muppet Movie.  I'm more than a little excited!

Wednesday, November 30, 2011

My "final" selection for Chasing Chevrons

I have so many WIPs right now that I actually have no business thinking about a new quilt, but what can I say? I like thinking about patterns and how I would do them differently. My fiancée likes to joke about my cooking television show - "the tall order chef" - in which I will take a meal that should take half-an-hour and instead make it take 3 hours. Perhaps that is true of my quilting as well, but you never know until you try! I'm going to try the grid method and Thangles for my half-square triangles for Chasing Chevrons - measured my fabric pieces last night so I can figure out the best use of the fabric. Also, instead of cutting all the background blocks and then sewing them back together, I'm going to figure out larger units to cut. This is partly because I don't have 3.5 yards of fabric for my background so I'm hoping those seam allowances will help make my 3 yards and a few inches work, and partly because I like making things harder in the name of making them easier! Also, it has a lot to do with little time in the sewing studio and lots of time waiting around - commuting, waiting for mark-ups to begin in noisy environments where actual work would be difficult, brief lunch breaks, etc.

So these are the fabrics that I think I'm happy with (after pulling lots of other combos). I was going to go with a light gray background, but the background is such an integral part of the quilt design and I love this aqua so much (and other than white or snow or various grays, I don't have huge pieces of fabric in my stash). I've either bought fabric for something specific or I've bought, at most, 2 yards (and usually 1 or even a half yard) for my stash. Of course, since I've pledged to myself not to buy any more fabric for 6 months (or until I significantly use up what I have), that limits my options a bit.


I plan on keeping enough of each print to make a scrappy binding - I think that might look especially good with this quilt.

So I'll plan, and I'll keep trying to clean out the studio so I can work in earnest soon - I folded a bit more fabric last night between turning off the work laptop at 10:30 and falling into bed! Can't wait to have everything organized to my liking! And all because I needed to find batting for Anne's quilt! I found it tonight, but managed to rewrinkle my top and back, so hopefully tomorrow night I can unearth the ironing board, give them a good press, and get that sucker basted!

Cindy and Sarah, thanks so much for your nice comments! I did get to peak at Aileen the Saturday before Thanksgiving, but she slept during our entire visit! She is really cute, though! Her poor mom had been asleep when we got there, and I've never seen Anne look so tired. I have to say, if my most energetic friend was that tired, I'm not sure how Bryan and I will survive a baby, since we're both older than the new parents by quite a bit (and will be even older by the time we get around to getting pregnant). So, I think I should make some baby things for our child in advance, just in case I end up sleeping every moment our baby is asleep! For tonight, though, I should go to sleep while our cat is asleep! She's been giving us practice waking up before the alarm, but I suspect tomorrow I'll be up before her for my Pilates class. I love Pilates...I must to wake up at 6 am! Hopefully I'll get some actual sewing time this weekend, and until then, I'll plan!

Monday, November 28, 2011

Behind again...

I'm behind again on my blogging, but I got in some lovely sewing time on Friday and finished the front and back of Anne's mini-quilt. I added some borders after taking this picture, so it's now about 28" square, I think.
Once again, I love my log cabin scrappy back...just enough fabric to finish it (and hoping the binding I made for the first quilt will have enough left over (planned overs, my mom calls them) to finish - otherwise, I'm in trouble).
I was trying to find batting, which lead to the long awaited major sewing room reorganization. The problem is that work promises to be insane for the next 3 weeks, and I can barely step into the room right now. Not good!

I did finally decide on my fabrics for the chasing chevrons quilt along - will try to get a picture up soon, along with my photo tour of the Capitol Dome!

Sorry for going back to my absent blogger ways...lots to share, but not enough hours in the day (or, rather, higher priorities for those hours...pies needed to be baked, green bean casserole needed to be prepared, and our Porksgiving extravaganza needed to be enjoyed! That's right - we celebrated Thanksgiving with delicious pulled pork BBQ (smoked a pork shoulder all day!), sweet potatoes, spoon bread, Not Your Mama's Green Bean casserole, pumpkin pie and pecan pie. Fresh dinner rolls on Saturday for eating leftover BBQ sandwiches was a real hit, too! Wish we could do it all again next weekend!). We also had a major housecleaning - finished hanging our pictures, and I even finished unpacking my clothes from when I moved in back in March! Not sure what I'll do now that I don't have to step over suitcases on the way to the bathroom in the middle of the night! And a vacuumed living room...were we abducted by aliens and reprogrammed...perhaps!

Hope you all had wonderful Thanksgivings, too!

Saturday, November 19, 2011

Slow progress

I understand now why basket weave sashing is not all the rage! Progress is slow, and without my scraps to keep myself straight, it would be impossible. But, with that said, I'm enjoying the puzzle-like nature of it. I thought about taking it to the guild meeting to try to finish before seeing Anne this afternoon, but I think I'm too dependent on my design wall, so oh well...I'll just have to visit again soon when it is finished!

Update: As of Sunday night, I had completed the top half of the quilt, and it looks fabulous!  I made plentiful use of a new bottle of "Best Press" that I bought at Capital Quilts after the DC Modern Quilt Guild meeting on Saturday - wow - where was that all my life?!?  I have been using spray starch occasionally, but I'm extremely sensitive to scents (aka massively allergic to most scented things - scented candles = itchy, red, oozy, angry skin), so I was delighted to find an unscented starch alternative that isn't in an aerosol bottle.  

Anyway, I did have to do some seam ripping (including the fact that I figured out I'd sewn 1 block incorrectly...you can just see it peaking from the bottom of this picture).  Ah well - that's what seam rippers are for!  But...I foresee the second half being a little easier, now that I'm getting a feel for it.  And, in looking at this quilt all together, I think that there would actually be some easier ways to piece it.  Cindy was right - it really doesn't look anything like the garden fence anymore...I was pretty surprised at how much making the inverse of the pattern changed the look.  Good to know for the future!

So, when I have the whole top together, I'll be asking for your opinions on a new name!  

Thursday, November 17, 2011

Lobster and Mushroom Cream Sauce over Pasta - "It's what's for dinner"

On weeks like this, when work is really difficult, exhausting, and frustrating, I like to spend my train ride to and from the city imagining what I would sew if I had more time in my studio. I'm pleased if I can just get dinner done and the dishes cleaned up before collapsing (and I've learned from experience that sewing is a mistake when I'm that tired!). Imagining is definitely the way to go!

Last night, after racing the whole day, I needed to cook a nice dinner for us using the old "what ingredients are in my fridge?" method of meal planning. I was lucky, because the ingredients were pretty awesome!

I had most of a perfectly cooked lobster from my incredibly awesome "Master Chef" series cooking class at Culinaerie in D.C. on Tuesday night (the topic was crustaceans, and the shrimp bisque and jambalaya leftovers had already made for a pretty above average lunch!). So, after getting our hunger in check with a couple of bites of leftover red beans and rice that Bryan couldn't finish on Tuesday while I was in class, I used the new method we learned for de-shelling the lobster (brilliant), cut my beautiful whole claw and tail meat into smaller bites the size of the pieces from the knuckles, melted some butter in a pan, and tossed in the lobster just long enough to warm it. Wish I had an appetizer like that every night! I think Bryan really extra-appreciated how worthwhile my class is as we fed each other warm, buttery lobster! The secret - bring the pot of water to a boil, put in the lobster, and start timing when the water comes back to the boil. Cook for 9 minutes for a 1 pound lobster, adding 1 minute for each additional quarter pound. Pull it out of the water, grasp it with a towel and quickly remove the tail and claws. Toss the claws back in the boiling water for another 2 minutes, and quickly cool each piece as it comes out of the water (run it under cold water or toss it in an ice bath) to prevent the residual heat from over cooking it. My chef-teacher made an incredible Asian-style lobster salad with a lemongrass aioli, shiitake mushrooms sautéed in sesame oil, sesame seeds, scallions, and cilantro (as I recall without looking at my notes). It was fabulous, but lobster in plain melted butter is pretty hard to beat!

Anyway, I then threw together a portabello and button mushroom cream sauce with shallot, rosemary, thyme, and white wine over some Super-pasta, with a side of steamed broccoli. Not bad for a weeknight supper (understatement!), but definitely the explanation for no sewing progress. I'm out with a friend tomorrow, so it looks like Friday night will be my night to finish Anne's quilt before visiting her and meeting Aileen for the first time on Saturday. Hopefully it will go speedily, and if not, I'll finish it by the time they are back from Thanksgiving! One thing I've decided...I have enough stress without stressing over my hobby!

I'll have a cool post, hopefully tomorrow, showing the one really awesome, special thing I got to do today. Here's a hint...

Tuesday, November 15, 2011

Housework!

So, sadly, the long weekend went by without any sewing. :( Bryan and I are hosting his mom and uncle for Thanksgiving, so we spent the long weekend focusing on getting the house in order. Little things like replacing the powder room toilet, which turned out to be much more difficult than our first toilet replacement in Bryan's bathroom. We'd grown so confident after our first try was so successful, but apparently we need toilet shims or something, since the toilet is at least 1/2 inch off the floor and shifts when weight is applied. Wish us luck - we'll need it!

Our big focus was consolidating/organizing/hanging artwork. Bryan's dad, Claude, is a very talented painter, and we had a number of unframed canvases that we wanted to hang, as well as a huge stack of art his mom no longer wanted but that Bryan kept for the frames. So the process began of trying to find appropriate frames for our favorites. We had some success! A few of the combos worked so well that we decided we couldn't have found a better match if we'd had them custom framed. Check these out!


The sailboat with the yellow mat is incredibly special to me. I am not a painter, but on our last visit to Greenville, I got my long-standing wish of a painting lesson. I thoroughly enjoyed watching Claude paint, hearing him explain how he goes about it, and just having that quiet time with him. Here's my version...and let's just say it will not be framed for viewing, but I'm keeping it with his painting. Someday, I'll be able to show Claude's grandchild the paintings that he and I worked on together, hopefully alongside many canvases painted by Bryan.

Bryan is also a very talented painter, though I didn't know that until that visit. After my painting lesson, Bryan sat down and painted a picture from a photo that he took on our vacation to Croatia last year.   It's the image I put in my mind when I need to relax, and I was pretty blown away that Bryan could paint that well after not doing it for so many years. He gave the painting to his dad - a long overdue promised gift, and I'm hoping he'll paint another version for me someday. Amazing how special art made by someone you know and love can be! Whether it is a quilt or a painting, family heirlooms can be created if the intention to share a special gift or talent is there, and that process of creating together can strengthen bonds in a really unique way, I think. I still think fondly of sewing time with my grandmother and playing in the wood shop with my grandfather, and I miss them more because of that time spent together in a tangible activity that allowed me to get to know them in a different way.

And speaking of sharing experiences, I missed my mom this weekend when Bryan and I ran up to a French pastry shop in Baltimore for one of these! My mom and I love to travel to Paris together. Our last trip was 5 years and 1 month ago, right before I started my current job. It was a celebration of passing the Georgia Bar exam and becoming a "real lawyer", and we celebrated with our favorite - a choux chantilly from our favorite shop - Tout au Beurre. This picture is of the deluxe version of a cream puff - a Saint Honore - from Patisserie Poupon.  It was delightful! 

Thursday, November 10, 2011

Great progress and Quilt Along

I've been hard at work on the mini-quilt, except for a brief pause on Monday night to attempt to make my fiancee a sleep mask.  It was not a success, mostly because of a misunderstanding on how he wanted the design.  For some odd reason, he thinks that having a triple layer of tightly-woven fabric completely covering his nostrils might make breathing difficult...what a concept!  (Though he did agree that having the nose piece does really prevent the light from coming in and helps it stay in place!)  As an untrainable mouth breather, it never occurred to me, but that's ok - I'll now have a back-up mask once I finish hand-stitching the bias binding, and I'll keep working on the design in hopes that I can share a little insight.  I've so far learned what not to do, and that's a good first step!


This is where I started sewing last night on the mini-quilt, and by the end of the evening, I'd finished piecing all the blocks and made my scrappy pink sashing (though I still need to iron it - I made one very long piece of pink awesomeness!).  Next step, green sashing, and then I need to think about how I want to piece it.  I'm thinking about trying to do a sort of basket-weavy design to mimic some of the ins and outs of the green and pink...can't wait to play tonight after dinner! 

This is moving fairly far from the garden fence design - I might need to give it a new name (since mini inverse basket-weavy garden fence is a bit long)!  What do you think, Cindy?  Have I strayed enough to give it a new name?  Or do you want to see the finished version before deciding?!?

My binding is already made, so after I get the top done, I just need to come up with a back (which I keep wanting to start on, but I'm waiting to see the final size of the top first, since I may decide it needs a border of the floral on the white background...won't decide until I'm there!)  That back will be the most challenging, as my fabric scraps are getting quite depleted - it will definitely be improvisational, but I'm fairly sure that I have enough - glad I made the binding first (and I saved the trimmings from the big quilt, so I may resort to piecing those little bits if I have to)!  Of course, if I have any leftover, I'm excited to try making a baby bucket hat from the Oliver + S book that was featured on a blog the other day...and the cycle continues!


And in other news, I've decided to try my first quilt-along!  Jennifer from That Girl, That Quilt is hosting a Chasing Chevrons quilt along, and it looks like fun!  I've watched so many quilt alongs, but I have so many projects on my to-do list that I've always felt guilty jumping into a new one.  Well, I've finished a lot of quilts lately, and this blog is making me feel like I can get even more accomplished (mostly because of such great encouragement - thanks for all the great comments, and a special thanks to everyone who is now publicly following me - it is nice to know that I have more readers than just my mom and a few old friends!).

That Girl... That Quilt

I'm so excited to see how it goes, and I'll try to share any changes I make or different techniques that I prefer, as well! 

Happy Veteran's Day, everyone, and wish me luck!  I'm hoping to finish this quilt in time to enter it in the Sew Mama Sew mini quilt contest on Monday!


Saturday, November 5, 2011

Another layout

So this is what Cindy's suggestion looks like on the design wall (though imagination is needed for the sashing-still not wanting to cut it all until I'm sure!)

What do you think? I think it is my winning layout so far. Sarah - I know what you mean about the potential of the sashing to break up the design, but I didn't think it looked right when I tried it with no sashing - too much white, I thought (though I appreciate the suggestion).

Thursday, November 3, 2011

Mini, inverse Garden Fence

Wow - I can't tell you how much I appreciate all the positive feedback on the original quilt for Aileen!  Thank you all for making me feel so good - I now understand why people take the time to blog!

I'm a pretty frugal person, and I love the challenge of using scraps from one quilt to make another one - especially because, in this case, the other quilt ended up pretty large, I just adore these fabrics, and I am not ready to be done with them!  I also thought Anne would enjoy having a smaller version to throw over Aileen in the stroller or car seat.  So as I was working on the big quilt, I had lots of strangely sized scraps that I cut into 1" width strips that I could use to make a half-scale, inverse of the original. 

So, I cut 16 (actually 18, because I can't count) 2.5" squares of the white-on-white and then surrounded each square with my 1" strips of the prints cut to either 2.5" or 3.5" lengths.  I ended up with a 3.5" block.  I then cut print pieces that were 1" x 1.5" and sewed them between strips of white that were 1.5" x 2.75".  (I started trying to differentiate between the two sides and was sewing some of the print pieces to 1.5" x 1.75" pieces, but I decided I wanted the design freedom to have them all fit either side, and then I'd trim the extra white off as I pieced the blocks.  There was some level of planning involved at this point, in that I wanted the prints in the outer strip to match what was in each block, so I figured out how many sides featuring each print I'd need (since I'd been fairly random on the blocks, just trying to use up the smaller pieces as much as possible, the prints aren't distributed evenly (because I wanted to save the biggest pieces for the back of this quilt - I thought I had an uncut fat quarter left, but realized that I used most of it for the center square of the back of the other one - d'oh!)).

Then I went to work.  Because many of prints were used in small numbers and I was working from scraps (including extra pieces of the 1.5" white border from the back of the big quilt), the usual method of cutting all the pieces and then chain sewing the units worked well for each little set.  But, I had about 4 prints for which I was going to be using a longer piece, so I used a more efficient technique.  For example, the green with small multi-colored "lanterns" (as I dubbed them) would be 14 sides, or 21" of the print to be sandwiched, so I cut 2 2.75" x WOF strips of the white, cut them down to 22-ish", sewed them to either side of my green strip that was also about 22", pressed the seams open, and then subcut my units from there.  Much faster and more accurate, I think - especially because I could resquare them as I cut along the strip, which I found I needed to do several times.  Also, once I decide on layout, I'll be trimming everything to make sure it is all perfect, anyway, since I'm pretty hung up on precision, especially in a design like this.  I love "intentional wonky", but that's different!

So, here's where I need your help.  I'm very torn on the best layout.  The layout in the first picture was suggested by my lovely fiancee (because he was so helpful in the final layout of the other quilt), and I like that because you see a bit more of the pattern.  But with that pattern, it is slightly more difficult to decide on sashing placement - thus I played with scraps below to try to figure out what would look best.


Then, I decided to try my original idea of switching the sides (below), so that in each block, all of the verticals are one print while all the horizontals are the other print.  And then I thought I would alternate the blocks.  I was then thinking about trying to do a double layer of sashing with the floral print on the white background between the pink and green print.  The downside of that design is that you lose the linking that comes from those little bits of print moving out from the central block.  I should have laid that out, too, but I didn't want to cut that fabric down if I wasn't going to use it.


Anyway, I'd love your opinion and feedback on either of the above choices or on a different way entirely. Another thought is to use the final concept but make it only 3 blocks square, instead of 4, and end up with two tops.  I'd be slightly afraid to try to use them as a front and back, since the chances of me aligning them perfectly seems slim, but I could try.  Or, I could back the second one with one of the fun batiks that I've found to match the colors.  Hmmm...maybe even have a quilt to sell to cover the costs of all the fabric I've been buying for charity quilts of late...that's another idea!

I'll set this aside until sometime this weekend (though it kills me because I want to get it done!), but I'd really like your feedback.

In the meanwhile, I've had an order placed by said lovely fiancee for an eye mask.  I've been wearing ones that I've gotten from airlines for a few years, which is pretty ridiculous since I can sew!  He tried mine the other day and saw the beauty of it (plus, I've never made the black-out curtains that I promised to make back in April, so this will be a good short term solution until I'm ready to tackle that task...after I finish cleaning up/organizing the Woman-cave (aka studio)!).  I'll try to actually take some pictures and write my first tutorial as I go, since I'd guess that these could make fun Christmas presents.  I mean, really...the gift of good sleep is priceless!  And hopefully by this time next week I'll have another completed quilt to show off, and my design wall can once again be covered in a storm-at-sea quilt that I desperately need to finish!

Friday, October 28, 2011

A quilt for Aileen Ruth

I've been calling this quilt "Anne's quilt" over the last few months of working on it, because my dear friend from law school, Anne, was having a baby girl.  Well, I just heard from Anne that said baby girl arrived yesterday, so I can now retitle this quilt "Aileen's quilt". 

(Forgive the strangeness of the picture - I had it turned sideways when we took the picture on Monday night, but through the power of photo-editing, it is now the "correct" orientation!)

I am so incredibly happy for Anne and Cillian on the beginning of their family, and I'm very happy to have been able to be a tiny part of the nesting experience!  Congratulations, y'all!

Anne is one of the first people whom I taught to quilt.  It's hard to believe, but that's been almost 6 years ago now.  Anne wanted to make something for Cillian's sister, Clodagh, for her new baby, and I confidently told Anne that we could finish a quilt in a weekend, no problem!  :)  OK, well, we did get the fabric purchased and the top pieced in a very long day, but I might have underestimated the time it would take to make.  I'm so glad, though, that Anne got hooked, because she has become my faithful quilting buddy, and I think at this point that she's probably finished as many quilts as I have, which is especially awesome since she hand-quilts them.  I love hand quilting, but having finished a huge batik sampler that was hand-quilted over multiple years, I've been sticking to a combination of machine and hand-quilting on most of my recent quilts.

Of course, one thing that also really slows me down is that I like having pieced backs, too.  This quilt, though, took the concept to the extreme.


I had a nice 2 yard piece of the white background flower print that I bought with Anne in mind quite awhile ago, since I knew she liked those shades of pink and green.  (Part of the hint was a great large bag that she made for me out of those colors to haul around my quilting stuff in several years ago!)  But, I really wanted to save that yardage for a coordinating crib sheet, so I was determined that I could make the back using up scraps from the front and the extra fabric we had leftover from making the crib skirt and cushion covers for the nursery.  I came up with this design based largely on what fabric I had left, and I actually like the back just as much (maybe even more) than the front.


In this picture, you can see a bit more of the nursery.  We made the crib skirt together (and I made it way more complicated than it needed to be, but it is awesome - the pattern continues around the ends, even though it is from a separate piece that overlaps to go around the crib hardware!).  I helped a bit with the rocking chair cushion covers, though re-covering an oddly shaped cushion and trying to put batting underneath to block out the former gray cover was way more challenging than I would have expected (or I was having a really off day!).  Anne, though, managed to figure out the bottom cushion while I was throwing my hands up and losing all self-confidence, so there you go!  And Anne made the incredibly cute pillow all on her own - I love it!  She also made a sweet valance that isn't pictured.


These two pictures show a little more detail of the quilting - I did a combination of machine quilting and hand quilting.


I didn't measure the finished size with the binding, but I think it was around 48" square.

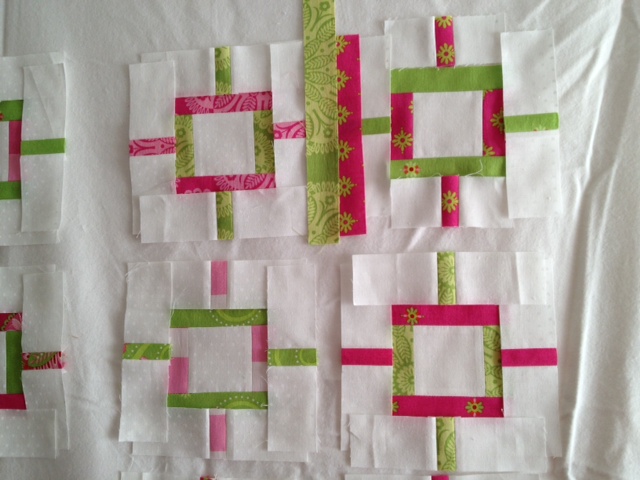
The design on the front of the quilt is inspired by Hyacinth Design's Garden Fence, which I first saw in quilt form through Elizabeth Dackson's blog, Don't Call Me Betsy.  I'm so happy that both of these quilters shared their work on the Internet, because I just love the design and plan to make several more in a similar fashion.  I've changed the measurements slightly to accommodate charm packs and "dessert rolls" (5" by width of fabric strips), and I've been playing with ways to make the piecing more efficient.

Most of the fabric was the gypsy rose colorway of the Gypsy Bandana collection by Pillow & Maxfield for Michael Miller Fabrics.  I bought a collection of 12 fat quarters from Hancock's of Paducah for $19.98, and I had a white-on-white star print in my collection that I bought on one of the drives between home and law school 7-8 years ago at Mary Jo's in North Carolina.  I used Guterman 100% cotton white thread for piecing and their quilting weight cotton thread for the machine quilting.  I did my hand-quilting with a pink thread from Mettler.  I used bamboo batting, which Anne and I both love, though I seriously considered a higher loft polyester so that all of those many lines of quilting would show up better.  In the end, though, I wanted the breath-ability of the bamboo so that little Aileen wouldn't overheat!  I used my walking foot to go 1/4 inch from either side of all of the sashing, starting in the middle and working outward.  This would have been so much easier if I were more comfortable with free-motion straight-line quilting, because each 90 degree turn required a pretty major re-shift of the quilt.  If I were doing anything larger, I would use a different design (though I really like how the overlapping stitches worked out at various corners).

I'd been reading in Elizabeth Hartman's book The Practical Guide to Patchwork that she (and a lot of other folks in the modern quilt guilds, like Jacquie Gering of Tallgrass Priarie Studio) are proponents of ironing the seams open, so I tried that, because, well, I am really impressed by both of their work, and I'm always looking for a way to improve my techniques.  I was really happy as I was piecing the top because it seemed very flat, crisp, and accurate.  Indeed, I thought I was going to be a convert (and may still be), but I found I had a hard time when it came time to make the quilt sandwich.  I very carefully pressed my top and back (and I had been pressing my seams as I went along, of course), but when I laid my top on my batting and started trying to smooth and position it, I found that some of my seams were flipping around and being wonky.  I guess maybe that happens no matter how you press them, but because the piecing was so flat otherwise, it made it more obvious?  Also, I missed having the ditch to stitch in - I like how that looks so much, and for a design like this, I think it would be very effective, since there is so much already going on with the fabrics that the quilting was a less important design element.  If I were doing an all-over free-motion quilt design, though, I can see where the pressed open seams would be a real advantage.  More experimentation needed, clearly!

For the binding, I used an incredibly helpful tutorial from Shelley Rodgers that I must have seen a reference to on someone's blog (I'm sorry that I don't remember which one!).  I have always used straight-grain binding before and hand-sewn it onto the back using a blind hem stitch, but I think this quilt will get lots of use and love, so I wanted it to be more durable, and Shelley's arguments about bias binding made a lot of sense to me.  Her method is pretty awesome, plus I like doing math, and using her formulas and knowing how much binding I needed and how much of my oddly-sized piece I had left allowed me to cut off the perfect amount and conserve the rest!

I read several tutorials on machine binding, and I am still working on it.  I attached the binding to the front first, and I thought I'd be able to sew it from the top without being able to see that I was catching the binding on the back, but luckily I figured out on the first side that this wasn't a good method, so I flipped it over and sewed it from the back.  Luckily, the white border makes it fairly unnoticeable on the front, and I was able to fix the couple of places that weren't caught in the first seamline easily.


Of course, I still have some leftovers, so I'm working on a smaller quilt, too, for the car seat or stroller!  It's amazing how many quilts can be made out of a fat-quarter bundle and a little yardage leftover from other sewing projects!  I'm hoping I can get a good portion of it pieced tonight while my sweetie is at a concert.  We'll see if the cat lets me...she'd rather me sit and watch Project Runway so that I can provide a warm lap!

Anne bought some fabric for quilting, too, and she's got a fantastic top put together, too, which I'm sure will be done in no time - Anne is a pretty fast hand-quilter!  Be sure to check it out!

Finally, since this is one of my first big projects since I started the blog that I actually have pictures of (thanks Anne!), I'm going to try linking up to the Blogger's Quilt Festival, as well as Finish it Up Friday!


Amy'sCreativeSide