Wow - I can't tell you how much I appreciate all the positive feedback on the original quilt for Aileen! Thank you all for making me feel so good - I now understand why people take the time to blog!
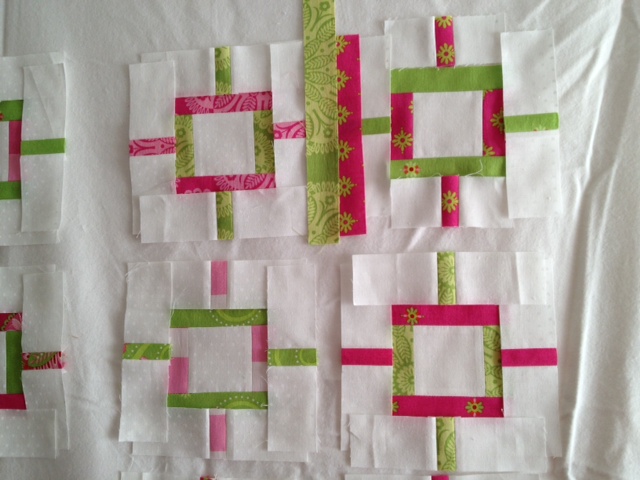
I'm a pretty frugal person, and I love the challenge of using scraps from one quilt to make another one - especially because, in this case, the other quilt ended up pretty large, I just adore these fabrics, and I am not ready to be done with them! I also thought Anne would enjoy having a smaller version to throw over Aileen in the stroller or car seat. So as I was working on the big quilt, I had lots of strangely sized scraps that I cut into 1" width strips that I could use to make a half-scale, inverse of the original.

Then I went to work. Because many of prints were used in small numbers and I was working from scraps (including extra pieces of the 1.5" white border from the back of the big quilt), the usual method of cutting all the pieces and then chain sewing the units worked well for each little set. But, I had about 4 prints for which I was going to be using a longer piece, so I used a more efficient technique. For example, the green with small multi-colored "lanterns" (as I dubbed them) would be 14 sides, or 21" of the print to be sandwiched, so I cut 2 2.75" x WOF strips of the white, cut them down to 22-ish", sewed them to either side of my green strip that was also about 22", pressed the seams open, and then subcut my units from there. Much faster and more accurate, I think - especially because I could resquare them as I cut along the strip, which I found I needed to do several times. Also, once I decide on layout, I'll be trimming everything to make sure it is all perfect, anyway, since I'm pretty hung up on precision, especially in a design like this. I love "intentional wonky", but that's different!

I'll set this aside until sometime this weekend (though it kills me because I want to get it done!), but I'd really like your feedback.
In the meanwhile, I've had an order placed by said lovely fiancee for an eye mask. I've been wearing ones that I've gotten from airlines for a few years, which is pretty ridiculous since I can sew! He tried mine the other day and saw the beauty of it (plus, I've never made the black-out curtains that I promised to make back in April, so this will be a good short term solution until I'm ready to tackle that task...after I finish cleaning up/organizing the Woman-cave (aka studio)!). I'll try to actually take some pictures and write my first tutorial as I go, since I'd guess that these could make fun Christmas presents. I mean, really...the gift of good sleep is priceless! And hopefully by this time next week I'll have another completed quilt to show off, and my design wall can once again be covered in a storm-at-sea quilt that I desperately need to finish!
Wow! First, I have to say that I really like the inverse of the pattern! If it were mine, I would do all the horizontals one color and all the verticals another color. I think you'll get a really interesting flow throughout the quilt. Your eye will be carried across or up and down the quilt by the continuity of color. If you don't want to do that, I would make it scrappy. Cut up your sashing strips into random lengths and sew them together to make the sashing. You could even do that if you stick with one color one way and another the other way. Whatever you do it'll be great! Can't wait to see it!
ReplyDeleteElle - You are an amazing quilter and one of the most generous people I know! Aileen and I are lucky girls!
ReplyDeleteI'm all about using the scraps. It's super cute! Sleep on it. Whatever you choose will be cute- there's no wrong answer. :)
ReplyDeletefor me, the sashing confuses the "connectivity" of the "inverse pattern". I would leave the sashing out entirely. maybe some kind of fun scrappy border to use up extra scraps?
ReplyDeleteI second "the Thompsons"...whatever you choose will be perfect! :)